"Travette Moderne" is the model name of this classic Crosley 182 set, from 1933/34. With a very exquisite design, zebra and satin wood veneers, chromium plated dial and volume indicators, and the fancy metal grill, it is a great example of the 30s 5-tube radios with attractive design. Definitely a great acquisition regardless the initial overall condition as one can see from the before and after photos.


The cabinet measures 8" high, 10 5/8" wide, and 5" deep and features only the broadcast band, BC. In the middle 30's, several manufacturers made a number of radios with this same general profile, e.g., Crosley 173, Philco 54, Aetna 252, Emerson 25-A, among others. The cabinet's veneer was coming off, the finish was flaking and badly worn, especially on the front and top. Inside the cabinet the chassis was pretty rust and missing the tubes 25Z5 and 78. The full floating moving coil electro-dynamic loudspeaker cone was totally torn. Otherwise complete, with knobs, speaker bolts, and the green on/off light indicator.


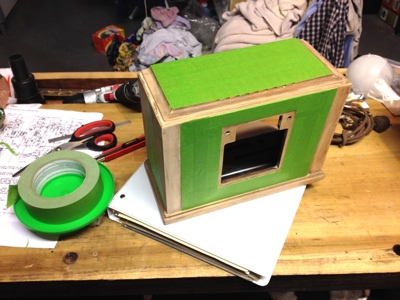
Cabinet Restoration - Before removing the old lacquer, I glued all loose veneer and cabinet parts. New veneer was used in the front to replace the ones with missing parts, but only after stripping and sanding the cabinet. The old finish was stripped with a citrus base remover, a plastic putty knife for scraping the softened lacquer, and an old nylon teeth brush for the details. The cabinet was cleaned with a rag moistened with mineral spirits. In the next day, after completely dry, the cabinet was sanded with 220, 320 grid sand papers, and 0000 steel wool. The next step was to glue the new veneer in the front, drill the necessary holes, and re-sand the cabinet. Then, I masked the original wood design with frog masking tape and refinished with 3 layers of Mohawk Van Dike lacquer toner (dark color), a chrome paint for some trim details, and about 4 layers of gloss lacquer by Mohawk.


Speaker Restoration - The speaker had a good 2000Ω field coil, voice coil and a good output transformer. However the cone was totally torn, with no chance of a simple glue fixing. I had no other alternative but making a new cone to replace the bad one. I used two 6" new paper cones to make the new replacement. Actually, the floating moving coil facilitated the work since I just removed the screw on the center of its spider to get the coil out (see photos). I cut one of the new 6" cones following the size and angle of the original, and glued the spider border in its bottom using the speaker frame as support and as centralizing guide. Next, I cut a paper cone strip to complete the new rebuilt speaker cone, as well as a base for the coil, both from the other new 6" cone. The foam ring and all other parts were glued together using shims to centralized the coil with the electrodynamic field coil iron core. That worked fine, speaker is back to life. Finally, I used a similar grill cloth replacement I had in stock.


The restored speaker


Chassis Restoration - The chassis was first wire brushing to remove the rust as much as possible, followed by a compressed air blowing. A phosphoric acid based product was used to remove the heavier and remaining rust. The chassis was again wire brushed with a finer carbon wire cone brush and compressed air cleaned to get rid of the loosen steel bristles. The electronics were in much better condition. All of the remaining tubes tested good. Apparently, only a round electrolytic cap were not original. However, all caps and almost all resistors were out of specification, at least 22% higher or lower from the original value. As an usual practice, I replaced all of the old paper and electrolytic capacitors with fresh ones. Also the resistors were replaced with new ones. The resistor on the power cord was replaced by a 25W 186Ω power resistor, underneath the chassis. All tube pin slots and the volume pot were cleaned with Deoxit contact cleaner. Apparently, the radio was ready to play. I plugged it in using a Variac and I brought the Voltage slowly up to 125 V. After a few minutes, no sound at all. After a few more measurements I found out that the pot was not working properly, with very unstable resistance readings. The problem was to find out the pot resistance value. No printed values or even clues either on the part or in the schematics. I looked for all over the internet and no success as well. I looked for similar chassis from other manufacturers and I came out with a 15KΩ pot. I ordered the 15kΩ and a 10KΩ pot from Play Things of Past - http://www.oldradioparts.com. After replacing the old pot with the new 15KΩ one, the radio came to life with a very low sound of only one strong station all over the dial. After some reading, I realized that either the antenna coil or the oscillator coil could be the problem. I removed, cleaned, and checked the antenna coil and both primary and secondary turns passed the continuity test. I repeated the above procedure for the oscillator coil. Bingo, one of the coils was open. It could be a huge headache if the open wire were inside the coil turns. Luckily, the broken wire was right at the coil terminal connection, since the terminal was loosened from the coil structure. I just soldered a small piece of solid wire to work as a terminal and re-soldered the coil wire. The oscillator coil then passed the continuity test. That done, I put the coils back together in their aluminum cans, reinstalled the tubes, and fired up the radio. This time I could listen to several stations in a clear and mellow sound. I used a Tektronix 2225 and a Heathkit signal generator to align the set. Finally, I put chassis and cabinet back together and made a back reproduction for the radio. I think the restoration was successful since the radio looks great and performs like a new 1933 radio.
For more picture please take a look at the radio technical page.


